If you’ve been wondering how to make a wall bed, you’re not alone. Thousands of people have asked the same question. If you don’t know where to begin, this article will walk you through the process step-by-step. Learn how to use a premade plan or kit to build your own wall bed and then install it on a wall! In this article, we’ll cover the basics of cutting plywood and attaching the bed frame. Then, we’ll talk about how to test the bed’s stand so you’ll know how it will work.
Using a kit or pre-made plan
If you’re looking to build a Murphy bed, you’ll need to know the basics. Basic Murphy beds look like a 1970s cabinet. The instructions provide clear pictures and easy-to-follow steps. You don’t need any special tools, but you may need to use a jigsaw to attach some corner rails. The basic plan is relatively inexpensive and can be completed in one weekend. You can also use IKEA cabinetry and shelves to store art supplies and other kids’ school supplies.
A folding wall bed frame should be built from 8-foot lumber. The mattress should fit snugly within the frame’s frame. You may also need to use weights to hold the bed down. You can use an elastic strap around 16 inches from one corner. Once the frame is complete, you can attach the mattress. If you have trouble determining the right size for your mattress, consider buying a kit or pre-made plan.
Some wall beds require a bit of muscle power to build. A kit will give you instructions for building the frame. The hardware for the bed will vary depending on its size. There are kits for twin, full, and queen-size beds. Many of these kits come with the bed frame, gas pistons, and other accessories needed to fold it. They are great for people with eclectic tastes.
You can find instructions on how to make a wall bed in the DIY section of a home improvement store. Before you begin, you should measure your bed’s dimensions and then draw a template. You can also use an online kit. If you’d rather use a kit, there are many plans available to make a wall bed. Just remember to use them as a guide.
Using a table saw or circular saw
The first step to building a wall bed is cutting the MDF to the desired size of the box. You can cut the length as you want or make it longer if you want to use a jig saw. Next, you’ll want to cut the profile for the footboard and notch for the wall trim using a jig saw. Start by assembling the back piece of the box. You’ll need to use a support block to hold it to the bottom. Use brad nails to secure the support block to the frame pieces.
To cut the plywood for the frame, start by measuring the offset of the saw blade from the edge of the base plate. Then, transfer this measurement to the plywood. Once you’ve cut the length, use a straight edge to guide the circular saw. Use safety goggles and keep your fingers at least six inches from the blade. Set the base plate so that it is 48 inches wide. Cut the plywood to this measurement, and then adjust it to fit the frame.
After measuring the length of the wall bed, you can install the hardware that connects the pieces. You can purchase hardware kits to make the project simpler, or you can build your own wall bed from scratch. Either way, it’s recommended to use a table saw for this project instead of a circular saw to cut the wood. Make sure you pre-stain the wood cuttings before you begin the project.
Once the frame is complete, you’ll need to attach the face frame to the footboard. This frame should have predrilled holes for screws, and you can glue it in place or use wood putty to fill nail holes. Once the frame and trim are attached, you’ll need to paint it to match the rest of the room and the bookcases. You may also want to use some wood glue on the box to give it a custom look.
Attaching the frame to the plywood
Start by preparing the wood. Start by cutting the pieces to the correct length and width. For example, if your wall bed is to be 77″ long, you would cut two pieces of 57″ plywood. Similarly, if your wall bed is to be 30″ long, you would cut two pieces of 57″ plywood. Then, sand the edges with a 200-grit sandpaper. Next, attach the two long pieces to the five short ones with wood glue.
Depending on the mattress size, you may need a larger plywood piece. Once you’ve cut the plywood, assemble the two frames. The first frame will have the plywood attached and will nest inside the second one. The second frame will be slightly wider than the first one. Leave space between the two frames for the swivel brackets. Once the two frames are together, the wall bed is complete.
Next, assemble the plywood. The inner bed frame has side rails and head and foot rails. The face panels should be cut with a 1/4-inch edging. After that, sand them again. Then, attach the plywood to the frame using pocket holes. Use wood glue to keep the structure together. Attach the headboard and footboard using wood screws or wood glue.
Before assembling the frame, you can attach the plywood to the frame. This will make the face of the bed. You should check both sides of the plywood to determine which one looks prettier. The prettiest side should face out. Assemble the rest of the frame. The final stage is the trim. Make sure to add weights to hold down the bed. Make sure the bed is secure and stable by attaching the plywood.
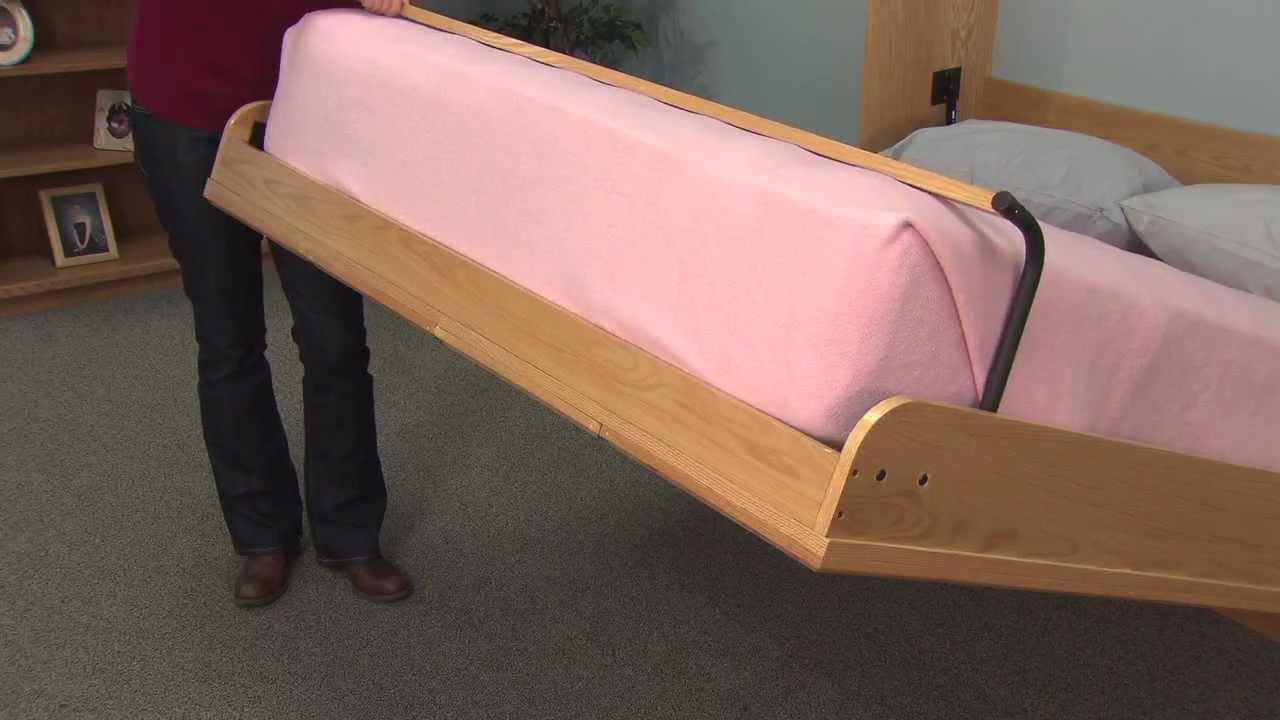
Testing the bed stand
Before assembling the bed stand, test its stability. Most wall beds are supported by a weighted mattress, so you should take measures to ensure the stability of the bed. Some wall bed stands can loop over the mattress, while others can tuck under it. The stand should support the weight of the mattress and its occupant. Make sure to install the stand before putting the mattress on the bed, and remove the bolts from the bed frame.
Using a spring or piston mechanism
A wall bed can be made by using a spring or piston mechanism. A piston lift system uses a flat wood platform and an inexpensive metal frame from China. A spring lift mechanism can cost a bit more but requires less wood. The downside is that the metal bars can damage a mattress. This is a much better option if you’re able to spend a little more.
The spring lift mechanism is the easiest to install, but you should always be sure to measure the wall space first before making your purchase. Make sure you have a space at least seven feet wide open for the bed to move. Using a spring or piston mechanism will require a seven foot space for the frame to move. If you’re planning to put the wall bed in a room with tile or hardwood floors, you should first cover the floor with a piece of cardboard or thin plywood. This way, it won’t scratch the floor. You’ll also need to make sure that the end of the piston fits onto a ball stud.
A spring or piston mechanism works by lifting and lowering the bed. Because a piston has fewer moving parts than a spring or piston, it’s more space-efficient. It also works quietly and without sagging. The mechanism is usually enclosed in cabinetry so it’s impossible to adjust it. It also comes with a strong locking system that prevents the bed from sagging.
The most durable wall bed is one made from solid wood, but this option is expensive. A lower-cost option is plywood, which is more durable than particle board and medium-density fiberboard. Both of these materials are heavier and add extra strength to the bed. In addition to wooden slats, the Wilding Wallbed is also secured with a locking mechanism. When the wall bed is closed, the locking mechanism folds the legs.